An Introduction to the Arduino: Overview and Getting Started
Overview of Arduino
The Arduino is an open-source electronics platform based on easy-to-use hardware and software used to build electronics projects. All Arduino boards have one thing in common which is a microcontroller. A microcontroller is basically a really small computer. With the Arduino, you can design and build devices that can interact with your surroundings. The Arduino boards are basically a tool for controlling electronics. They are able to read inputs with their onboard microcontroller (e.g.. Light on a sensor, an object near a sensor) and turn it into an output (Drive a motor, ring an alarm, turning on an LED, display information on an LCD).With the Arduino, makers and electricians can easily prototype their products and make their ideas come to life.
What can the Arduino do?
As mentioned above, an Arduino board are used as a tool for controlling electronics by reading inputs and turning it into outputs. But what exactly can they make or do? From a flamethrower to a walking robot, the Arduino board can be used to build many different electronic projects.
Here are some wonderful projects that you can do with the Arduino!
Arduino Arm Flamethrower

Source: Allen Pan
Arduino Robotic Arm
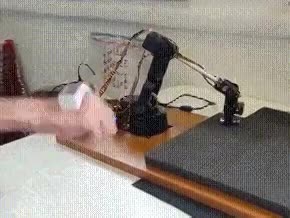
Source: Massimiliano, Michele Valentini
Coffin Dance Music Play

Source: RAC
Why to use Arduino?
There are many electronic boards out there, why use the Arduino board? Well, there are many reasons that make this microcontroller special. Advantages of using the Arduino includes:
Arduino simplifies microcontrollers for beginners
Besides the main microcontroller chip, a microcontroller will require many different parts for it to work. What Arduino did is that they took all the essential components of a microcontroller and design it in a way that is very simple to operate of a piece of PCB. This makes the Arduino boards welcoming to all beginners! Furthermore, with Arduino easy to use IDE software for beginners, the Arduino are easier to learn to program as it uses a simplified version of C++ compared to other programming software. Because of this, the Arduino is commonly cited as the pathway for everyone who is looking to learn about microcontrollers. With it being optimized for users of all levels, even advanced users are taking advantage of the Arduino IDE as well! In addition, the Arduino community is very big and many users and organizations are all using it. There are wide varieties of tutorials and projects available online that are pre-coded for you to learn and build using the Arduino allowing beginners to get started very easily.
Cheap
Whenever you are buying something, you will always look at the cost first. The Arduino are very accessible and cost-effective! You can get an official complete Arduino UNO Rev3 at only $24.95 or our very own Seeeduino V4.2 which is an Arduino-compatible board, that is based on ATmga328P MCU (same as Arduino UNO) at $6.90 only! Without breaking your wallet, you can easily get an Arduino for yourself to play with!
Cross-Platform
Arduino IDE is also cross-platform which means you can run it on Windows, Macintosh OSX and also Linux operating systems compared to other microcontroller systems which can only run Windows.
Wide Variety
The Arduino has many variations for you to choose from to allow you to pick one that suits your project the most!
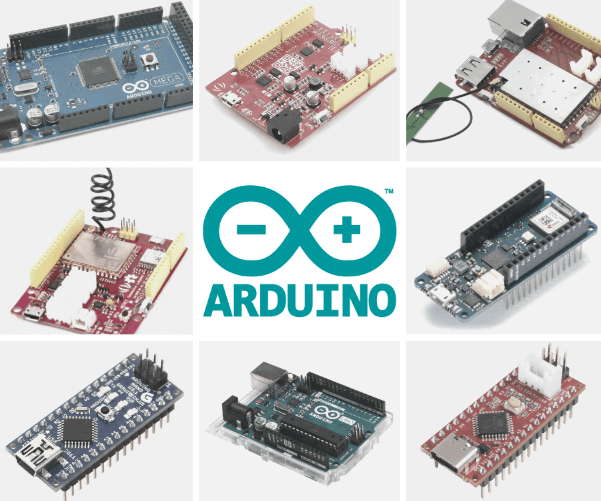
Types of Arduino
You may notice that there are many variations from official Arduino boards to Arduino compatible boards each with different capabilities and price points. Today, we have compiled some of them which are the most suitable for beginners! They are:
Arduino Uno Rev3
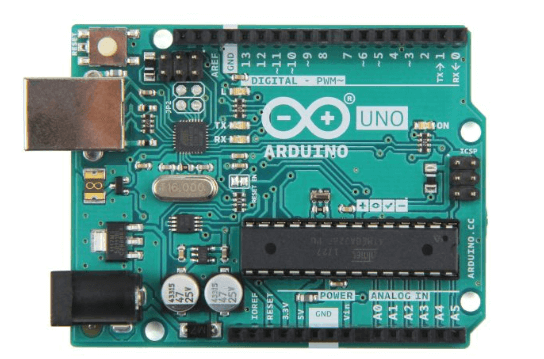
- The Arduino Uno is the ideal board for getting started with electronics, through fun and engaging hands-on projects. This board is your entry to the unique Arduino experience: great for learning the basics of how sensors and actuators work, and an essential tool for your rapid prototyping needs.
- Arduino Uno Rev3 is also the most used and documented board in the Arduino family. There are many tutorials and projects available online with instructions for you to get started.
- It has 14 digital input/output pins (of which 6 can be used as PWM outputs), 6 analog inputs, a 16 MHz crystal oscillator, a USB connection, a power jack, an ICSP header, and a reset button.
- It contains everything needed to support the microcontroller; simply connect it to a computer with a USB cable or power it with an AC-to-DC adapter or battery to get started.
Seeeduino V4.2

- Seeeduino V4.2 is based on the Arduino UNO bootloader. Our Seeeduino V4.2 is basically a much cheaper Arduino UNO with more functions!
- It has the same hardware and functions with a few additional features only found on our Seeeduino V4.2 like:
- Switch to choose the system supply voltage, 3.3V or 5V, which is very useful if you want to set the system to 3.3V to save power.
- Three on-board Grove interface allows your board to easily connect to our Grove modules. (Will explain more about Grove in our Sensors and Shields sector!)
- Use of a DC-to-DC converter instead of an LDO (Low DropOut regulator), for enhanced efficiency
Seeeduino Nano
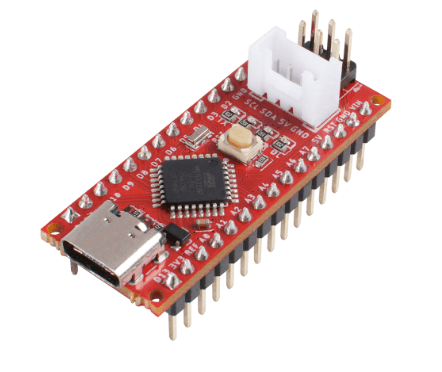
- Want a smaller Arduino UNO or Seeeduino V4.2 for your project needs? Then the Seeeduino Nano would be perfect for you!
- The Seeeduino Nano is a compact board similar to the Seeeduino V4.2/Arduino UNO, and it is fully compatible with Arduino Nano on pinout and sizes.
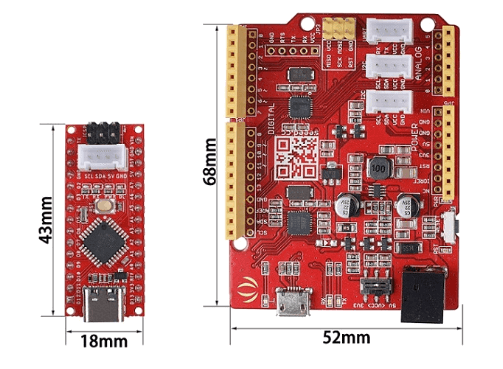
- Standing at 43.18 mm × 18.54 mm and less than a quarter size compared to the Seeeduino V4.2 the Seeeduino Nano size and also reliability allows them to be easily integrated into many projects like wearables, mini robots and many more!
- In addition, the Seeeduino Nano features 1 on-board Grove interface which allows your board to easily connect to our Grove modules.
Seeeduino Mega(ATmega2560)
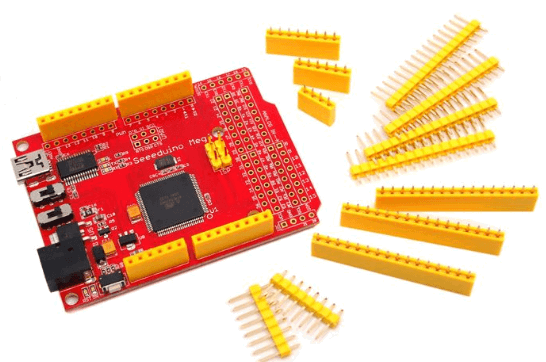
- Want a bigger, better and mega Arduino? The Seeeduino Mega definitely fits in that category.
- Seeeduino Mega is a powerful micro-controller derived from Arduino Mega. It features ATmega2560 processor which brings a large number of I/O pins.
- It features as much as 70 digital I/O, 16 analog inputs, 14 PWM, and 4 hardware serial ports
- Compared to Arduino Mega, we shrunk the volume of Arduino Mega by at least 30% and made it 100% compatible with Seeed Shield products.
- With this board, it is very suitable for projects which require many digital inputs or outputs like LEDs, buttons, etc.
Arduino Board Details
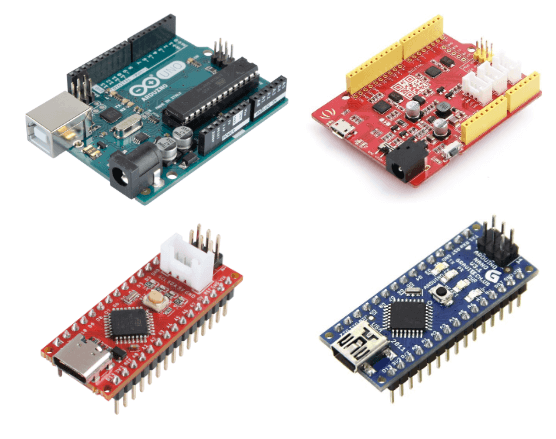
The physical hardware of Arduino is the board itself. However, when it comes to Arduino boards, there many varieties with different functionalities.Today we will be looking at our Seeeduino V4.2 which has the same functions as one of the most popular Arduino board the Arduino UNO. Most Arduino boards will have these various common components that we are going to list:
Compared to the Arduino UNO, it has some extra features which are highlighted in red which can only be found on our Seeeduino boards!
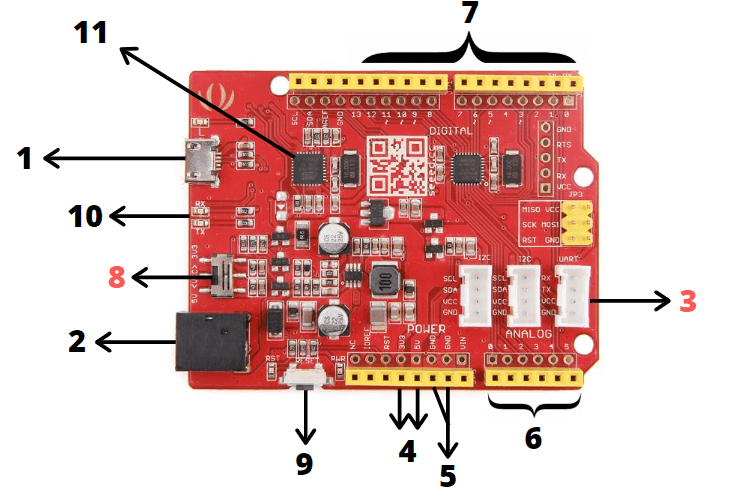
1 – USB Input
- USB Port is used to connect the board to your PC for programming and for powering up the Arduino board.
- This USB connection is important as it will be through this port where you will upload your code onto your Arduino board.
- To learn more about how to Upload Code on your Arduino, you can check out our tutorial on How to Upload Code on Arduino.
2 – DC Input
- The DC power jack allows your Arduino board to be powered from a wall adapter so that you can supply more power to your project if needed.
3 – Grove Connectors
- These Grove connectors can only be found on our Seeeduino boards.
- SeeedStudio has a variety of sensors/devices that can make use of this I2C or UART connection.
- With our Grove Connectors, you can easily plug-in modules to use with the Arduino without any soldering or jumper systems.
- We will elaborate more about Grove later on in our Sensors and shields section.
4 – 3.3V and 5V Pins
- As the name specifies, the 3.3V and 5V pins supply volts of power to your modules. The 3.3V pin supplies 3.3 volts of power while the 5V pin supplies 5 volts of power.
5 – GND pins
- With this GND (Ground) pin, they are used to ground your circuit.
- GND means this pin is at zero voltage with respect to the power supply and ground plane of the circuit board
6 – Analog Pins
- The analog pins allows the Arduino to read signals from an analog sensor like a light sensor and convert it into a digital value.
- Even though the main function of the analog pins for most Arduino users is to read analog sensors, the analog pins also have all the functionality of general-purpose input/output (GPIO) pins.
7 – Digital Pins
- On the Seeeduino or Arduino UNO, the digital pins are on pin 0 to 13.
- They allow the Arduino to read digital inputs like a button being pushed and digital output like turning on an LED.
8 – System Power Switch
- This system power switch can only be found on our Seeeduino boards.
- This slide switch is used to change the logic level and operating voltage of the board to either 5V or 3.3V which is useful as if you want to save power, you can set it to 3.3V.
9 – Reset button
- This reset button allows you to reset the board and restart any code uploaded on your Arduino board. Once pressed, the reset pin will be temporarily connected to the ground.
- This reset button is very useful for your projects in the event your code does not repeat itself but you wish to test it multiple times.
- This button is conveniently placed on the side to allow you to reset the Seeeduino board even when a shield is placed on top. This is not the case in other Arduino boards where the button is placed on top making it hard to access.
10 – RX/TX Indicator
- Also known as Transmit and receive indicator, the TX and RX LED indicators are connected to TX and RX of the USB-to-UART chip.
- They work automatically and lets you know when the board is sending or receiving data respectively like when you are uploading a program onto your Arduino board.
11 – Microcontroller
- On the Seeeduino V4.2 and Arduino UNO, they are based on the microcontroller: ATmega328P
- This is the primary chip which acts as the brain of your Arduino board.
- They allow you to program your Arduino in order for it to be able to execute commands and decisions based on the code.
- You will have to know which type of microcontroller your board is using before loading a new program from the Arduino Software.
- Even though the microcontroller on the Arduino boards is different, their difference is not big. The only difference that you may notice is the different amounts of onboard memory.
About the Arduino IDE
After knowing the hardware of Arduino, you will require software and programming to make your Arduino come to life and allow it to interact with various sensors and shields.
To program your Arduino, you will require the Arduino IDE software.
Helpful Resources for Starting Arduino
To help you on your journey in Arduino, here are some helpful resources that you can look at to get started and go further!
- Seeed Wiki – Information and tutorials on our Grove modules, sensors and Seeeduino boards.
- Seeed Project Hub – Find awesome Arduino projects with instructions and make them yourself!
- AllAboutCircuits – Electrical engineering & electronics community filled with Arduino tutorials
- Hackster.io and Instructables – Similar to Seeed project hub, you can find awesome projects done by makers with instructions and try it out for yourself!
- Udemy – Online learning platform with Arduino learning courses to learn more about electronics and Arduino.