How to use DHT11 with Arduino?: Reading Temperature and Humidity
About This project
The DHT11 humidity and temperature sensor make it really easy to add humidity and temperature data to your DIY electronics projects. It’s perfect for remote weather stations, home environmental control systems, and farm or garden automation systems. In this tutorial, I’ll explain how the DHT11 measures humidity and how to connect the DHT11 to an Arduino along with some example code you could use in your own projects.
DHT11 Sensor
The DHT11 is a basic, ultra low-cost temperature and humidity sensor. It uses a capacitive humidity sensor and a thermistor to measure the surrounding air and spits out a digital signal on the data pin (no analog input pins needed). Its fairly simple to use, but it requires careful timing to grab data. The only downside of this sensor is that, one can only get new data from it once every 2 seconds. So, the sensor readings will be about 2 seconds old. Compared to the DHT22, this sensor is less precise, less accurate, and works in a smaller range of temperature/humidity, but it is smaller and a bit expensive.
Technical Details of DHT11
- Low cost
- 3 to 5V power and I/O
- 2.5mA max current use during conversion (while requesting data)
- Good for 20-80% humidity readings
- Good for 0-50°C temperature readings
- No more than 1 Hz sampling rate (once every second)
- Body size 15.5mm x 12mm x 5.5mm
- 4 pins with 0.1" spacing
How the DHT11 Measures Humidity and Temperature
The DHT11 detects water vapor by measuring the electrical resistance between two electrodes. The humidity sensing component is a moisture holding substrate with electrodes applied to the surface. When water vapor is absorbed by the substrate, ions are released by the substrate which increases the conductivity between the electrodes. The change in resistance between the two electrodes is proportional to the relative humidity. Higher relative humidity decreases the resistance between the electrodes, while lower relative humidity increases the resistance between the electrodes. The DHT11 measures temperature with a surface mounted NTC temperature sensor (thermistor) built into the unit.
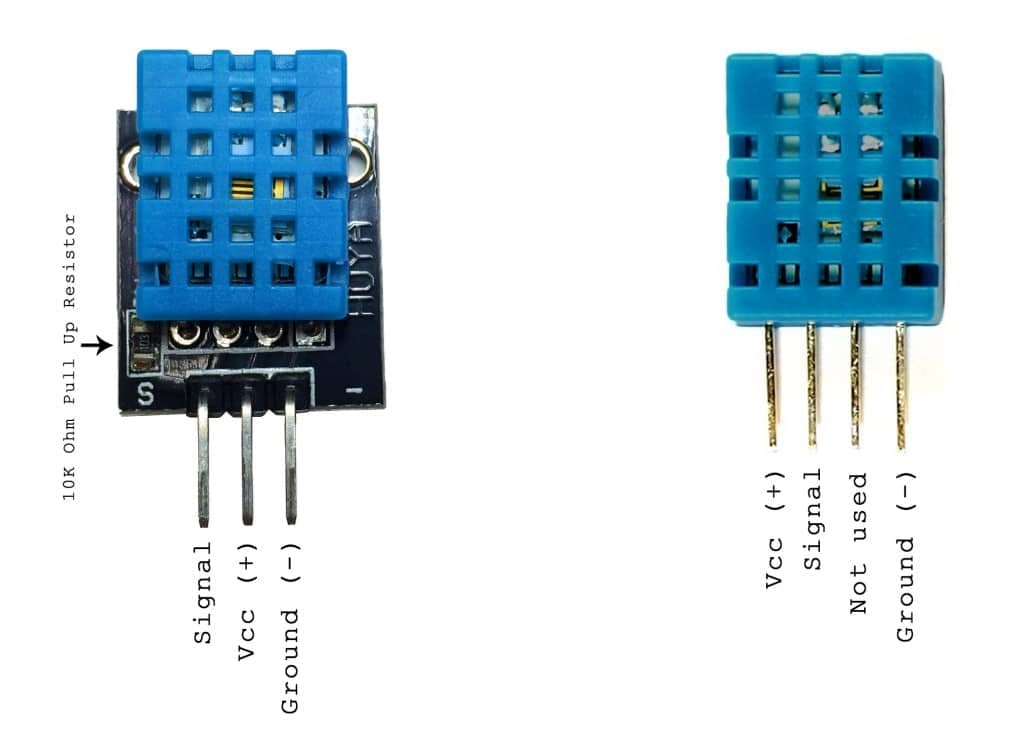
Actually, there are two different versions of the DHT11 you might come across. One have four pins, and the other have three pins which is mounted to a small PCB. The PCB mounted version is nice because it includes a surface mounted 10K Ohm pull up resistor for the signal line.
Here are the pin outs for both versions:
How to Set Up the DHT11 on an Arduino
Wiring the DHT11 to the Arduino is really easy, but the connections are different depending on which type you have.
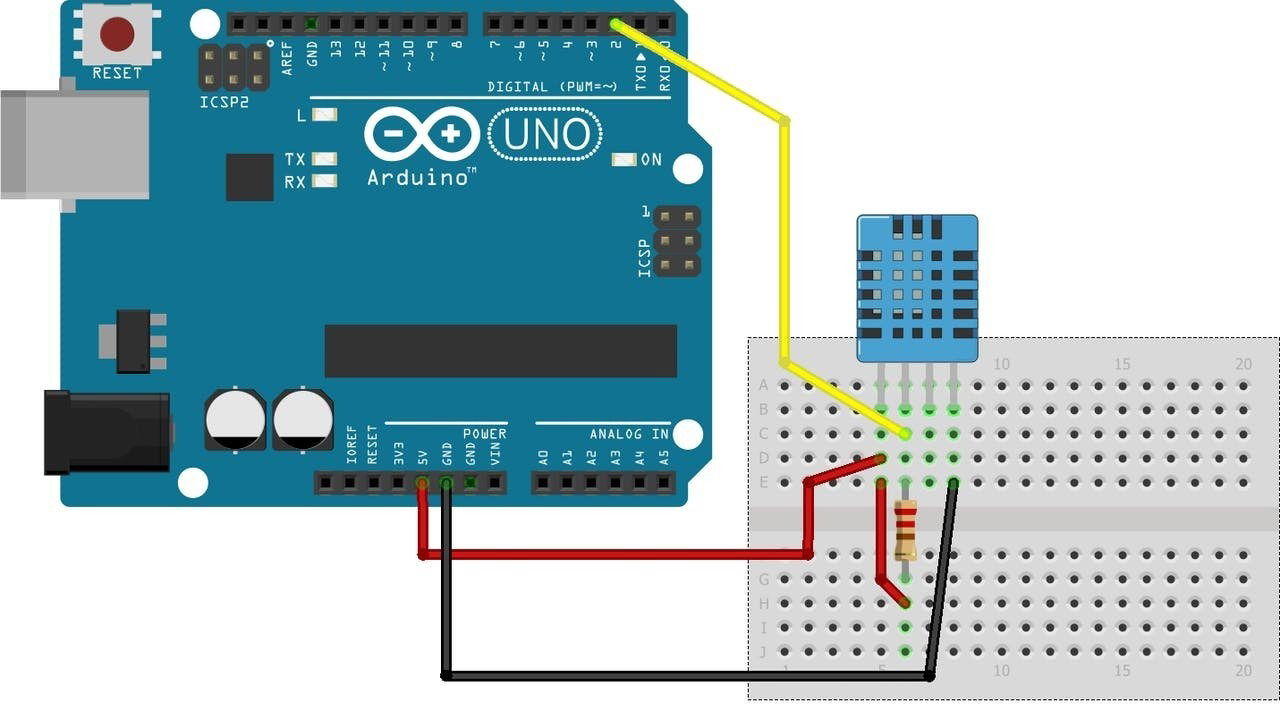
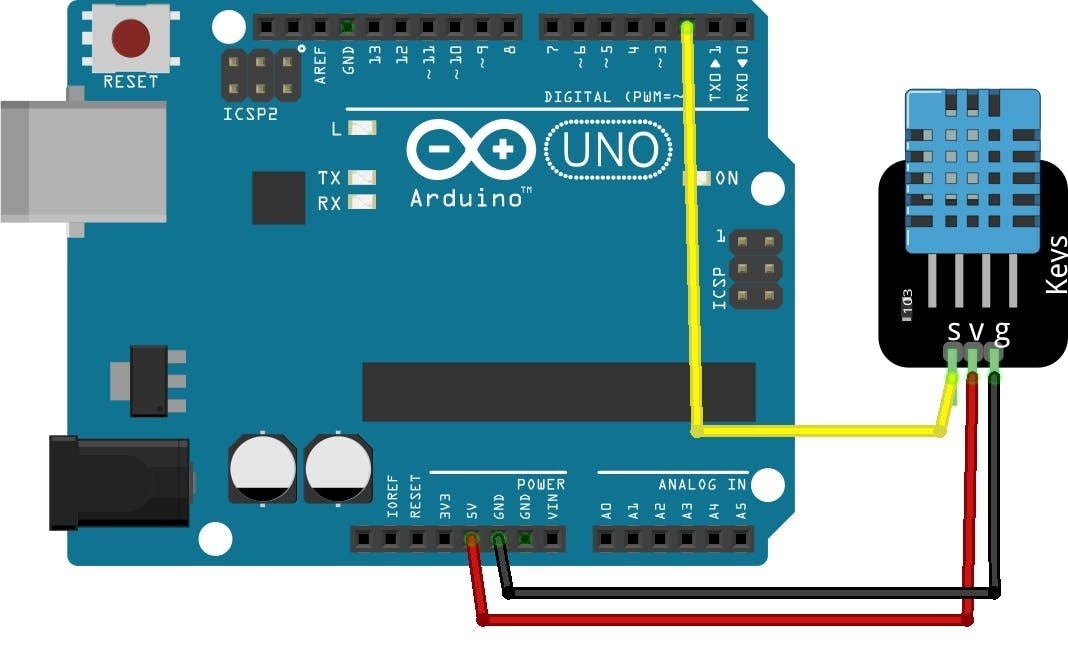
- VCC - 3.3 - 5V power supply (Sometime 3.3V power isn't enough in which case try 5V power)
- Data out - Digital pin 2
- Ground - Ground
Simply ignore 3rd pin in the 4 pin Sensor, it's not in use. You should place a 10 K ohm resistor between VCC and the data pin, to act as a medium-strength pull up on the data line in it. No such actions is to be made for the 3 pins PCB mounted sensor module.
Programming Arduino
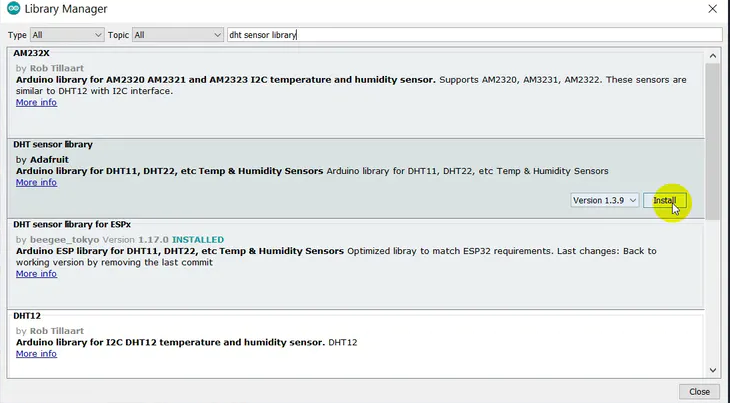
You should have the Arduino IDE software running at this time. Next, it’s necessary to install the DHT Sensor library, which can be done through the Arduino Library Manager: Sketch→ Include Library→ Manage Libraries…Enter “dht” in the search field and look through the list for the “DHT sensor library by Adafruit.” Click the “Install” button, or “Update” for the earlier version.

Programming
#include "DHT.h"
#define Type DHT11
int sensePin=2;
DHT HT(sensePin,Type);
float humidity;
float tempC;
float tempF;
int setTime=500;

void setup()
{
Serial.begin(9600);
Serial.println ("DHT11 Temperature and Humidity Sensor Test_RAC");
HT.begin();
delay(setTime);
}

void loop()
 {
humidity=HT.readHumidity();
tempC=HT.readTemperature();
tempF=HT.readTemperature(true);
Serial.print("Humidity: ");
Serial.print(humidity);
Serial.print("% Temperature ");
Serial.print(tempC);
Serial.print("°C ");
Serial.print(tempF);
Serial.println("°F ");
delay(2000);

}